How Indiekit works
Authorizing an application
With Indiekit, you can publish content to your website from any third-party application or service that supports Micropub.
However, asking for a password each time you want to publish a post can get tiresome. If you want to use an automated service to publish content for you, there needs to be a mechanism to prove it has permission.
For these reasons, Micropub applications can ask your Indiekit server for an access token. This base64url-encoded JSON Web Token contains the following:
- your website’s URL (
me) - what permissions it grants (
scope) - when the token was created (
iat) - when it expires (
exp)
Here’s an example of a decrypted and decoded access token:
{
 "me": "http://website.example/",
 "scope": "create update delete",
 "iat": 1673475400,
 "exp": 1681251400
}
Once an application has a token, it will not need to authorize itself again until the token expires (or its permissions need to be updated).
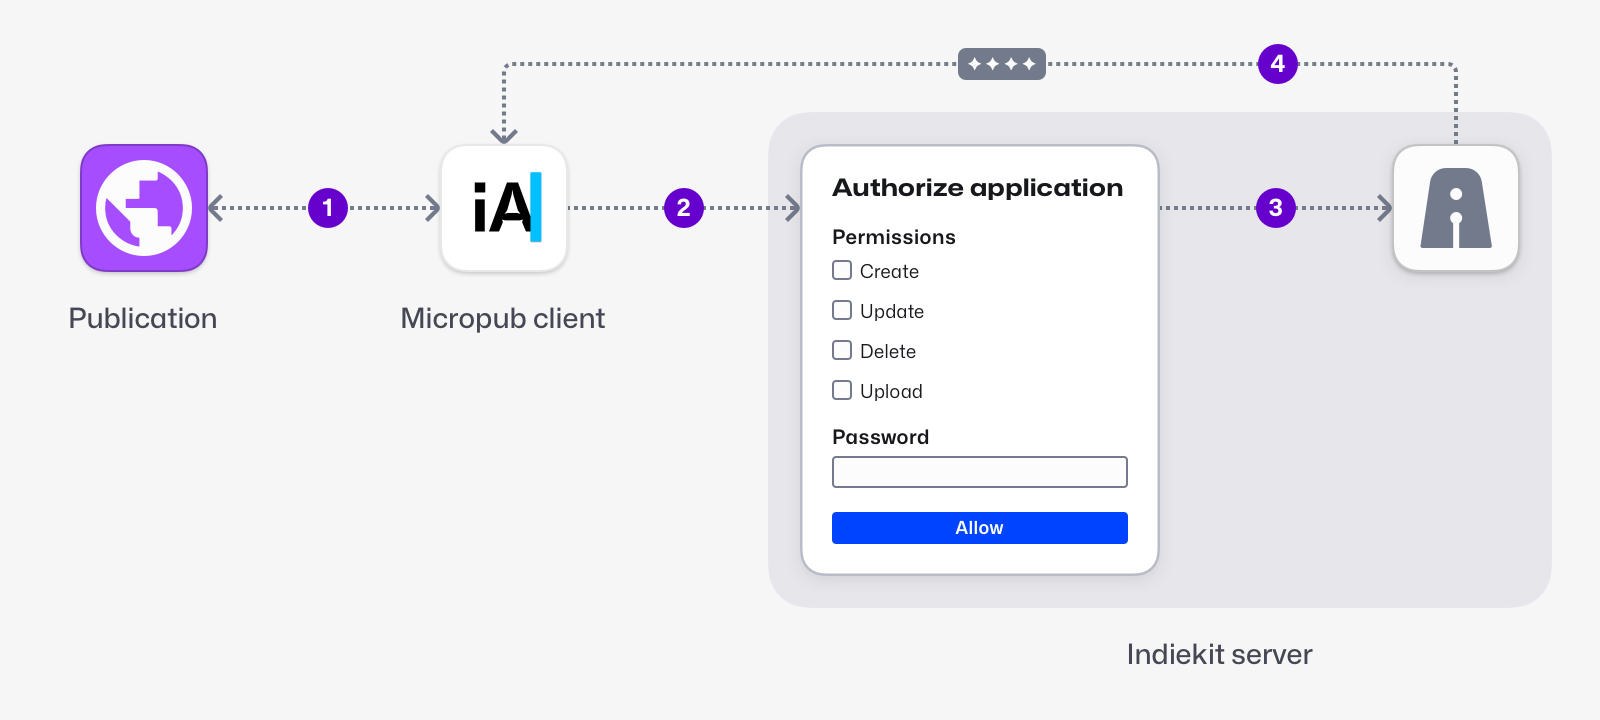
The authorization flow starts with the Micropub application (for example, iA Writer) asking for your website’s URL. The application then visits the given URL and looks for the following link relationships in the response:
- a Micropub endpoint (
rel="micropub") - an IndieAuth metadata endpoint (
rel="indieauth-metadata"), which in turn provides the location of your authorization and token endpoints[1]
- a Micropub endpoint (
Having discovered this information, the application makes a second request to the authorization endpoint with information about itself and the permissions it requires. A consent screen allows you to change the requested permissions before entering your password and authorizing the application.
If the password is correct, the authorization endpoint makes a request to the token endpoint which generates an access token.
This access token is returned to the application which can store it for future use.
Publishing content
Once an application knows your server’s Micropub endpoint and has permission to publish to your website, it can make authorized requests to your Micropub endpoint.
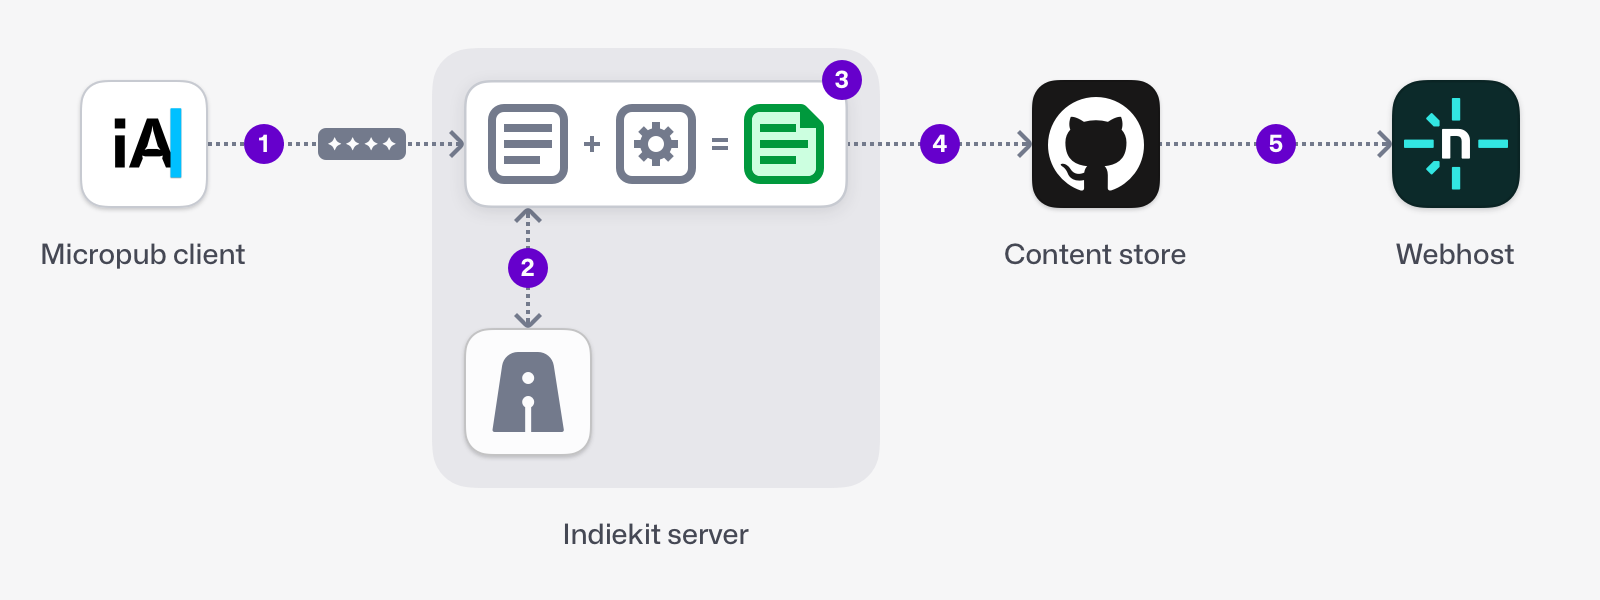
The publication flow starts with the Micropub application making a request to your Indiekit server’s Micropub endpoint.
This endpoint verifies the provided access token with the token endpoint.
Indiekit will then interpret the Micropub request. For example, Indiekit will identify this as a note post with the content ‘Hello world’:
shPOST /micropub HTTP/1.1 Host: indiekit.example Content-Type: application/x-www-form-urlencoded Authorization: Bearer [ACCESS_TOKEN] h=entry &content=Hello+worldYour post type settings, template and other configuration values are then used to determine how the post file should be formatted.
For example, if you have configured Indiekit to publish files to a site generated using Jekyll, Indiekit would create the following file:
yaml--- date: 2021-02-15T21:38:25.343Z --- Hello worldThis file is then saved to your content store using the configured location for the note post type. For example, if your content store is on GitHub, this file will be committed to your chosen repo and branch.
If your website is deployed every time there is a new commit, the new post will appear on your website (this may take a few minutes, depending on how you have set up deployments).
Sharing content with third-party websites (syndication)
Indiekit can be configured to share posts on other social networks, a process called syndication.
After publishing a post, pinging Indiekit’s syndication endpoint will check if any posts need syndicating.
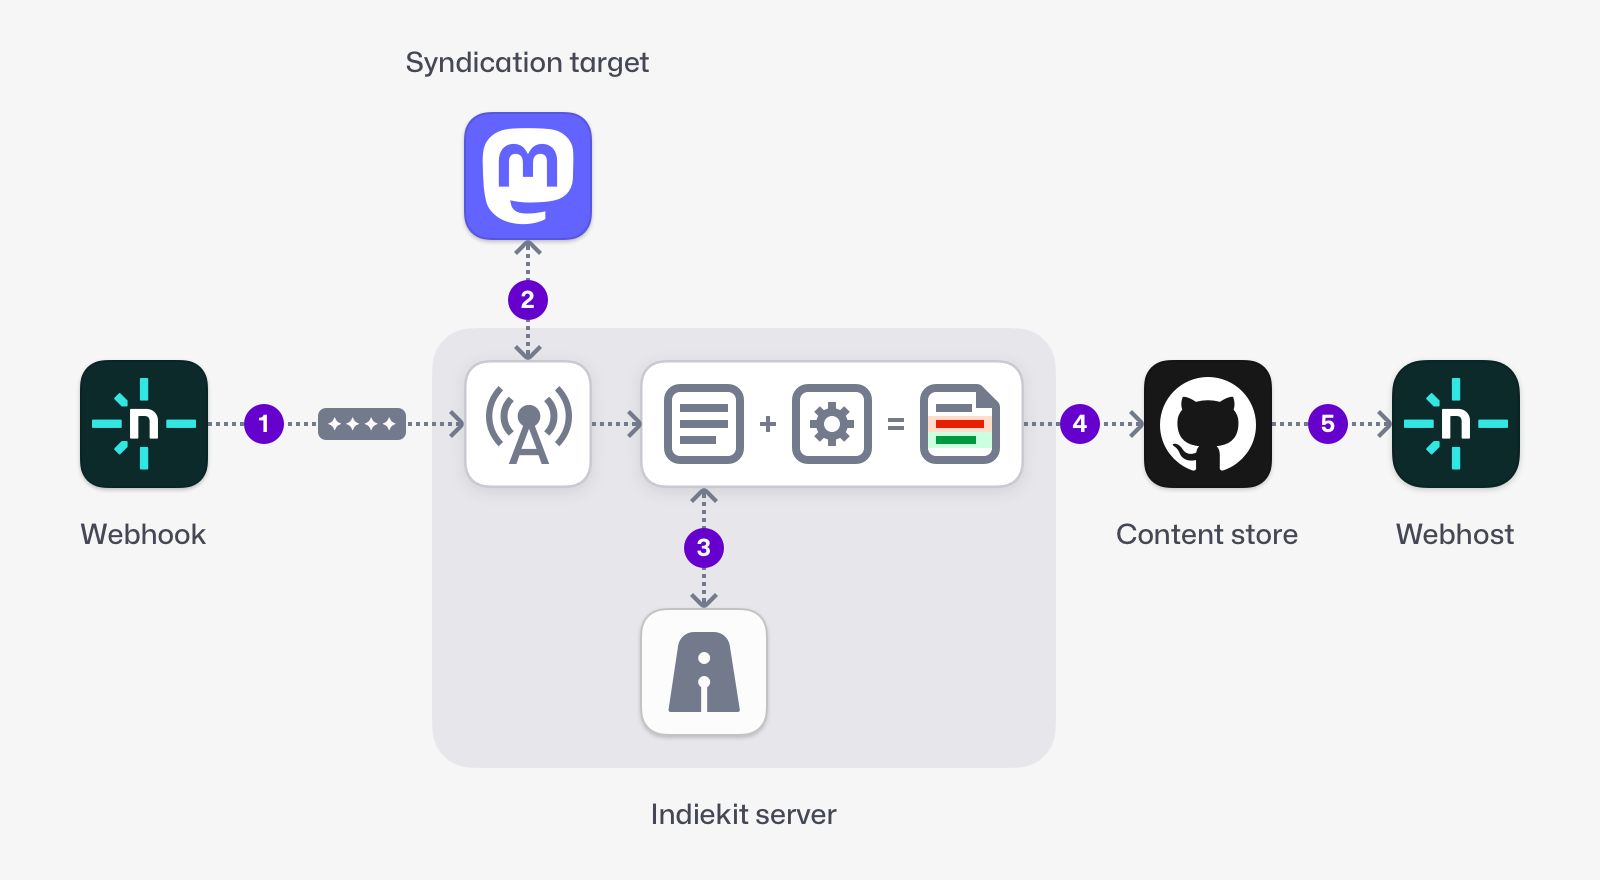
The syndication flow starts with a syndication trigger. For example, this could be a Netlify webhook making a POST request to Indiekit’s syndication endpoint:
shPOST /syndicate HTTP/1.1 Host: indiekit.example X-Webhook-Signature: [WEBHOOK_SECRET]Indiekit will look for the most recent un-syndicated post. If a post is found, each syndication target listed under its
mp-syndicate-toproperty will be sent a copy of the post. Each target then returns the URL of their syndicated copy.The syndication endpoint then calls the Micropub endpoint with a request to update the post with these syndicated URLs:
shPOST /micropub HTTP/1.1 Host: indiekit.example Content-Type: application/json Authorization: Bearer [ACCESS_TOKEN] { "action": "update", "url": "https://website.example/notes/1", "delete": "mp-syndicate-to" "replace": { "syndication": [ "https://mastodon.example/@username/12345" ] } }The updated file is saved to your content store. If your content store is on GitHub, an updated file is committed to your chosen repo and branch:
diff--- date: 2021-02-15T21:38:25.343Z + updated: 2021-02-15T21:40:15.131Z + syndication: + - https://mastodon.example/@username/12345 --- Hello worldYour website is deployed. Depending on your website’s design, your post may now include links to syndicated copies.
Notifying other websites that you’ve mentioned
Indiekit only supports IndieAuth, Micropub and syndication for now. Future releases will include support for Webmention and possibly other IndieWeb standards.
For compatibility with older Micropub applications, you can provide individual values for your authorization and token endpoints in your website’s
<head>(rel="authorization_endpoint"andrel="token_endpoint"). ↩︎